Two Images In One
 I saw an image that looks like one thing when you're close and other thing when you're further away. I planned to do one meself.
This is my first try on this one, but it still does the trick somehow. Have to better this technique more. How I did it:
What we need:
2 Images. Close-up larger than 1000px, Far away a bit smaller.
1 Photoshop
1 New Image that is something like 1000-1200px in size.
1 End result image, 130px wide and 220 high, 72dpi. (Screen)
How:
1. Take two images that are similar, put them on their own layers. The one you want to be seen when you're close should be on top, higher resolution / quality and sharper.
2. Desaturate them both. - Or if you want color images, then do desired color corrections, brightness, etc.
3. Take the top layer and align the major parts of it with the bottom one. Or vice versa. Adjust scaling when necessary.
4. For bottom layer, we only run Filter/Blur/Gaussian... on something like 10. A lot of it. That's about it for this layer.
5. Top layer. First, run Filter/Sharpen/Sharpen Edges and Filter/Sharpen/Sharpen More one or two times. (Not really necessary.)
6. We need to highlight the edges of the image. Do Filter/Other/High-Pass. Adjust so you see sharp edges, but still quite low contrast.
7. Just a tiny bit of Filter/Artistic/Poster Edges filter. Lowest settings on thickness and intensity. Posterization quite high.
8. Select all, copy, deselect all. (CTRL and then A, C, D.)
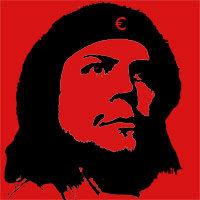
9. Add a mask to the layer, paste the clipboard to the mask, invert. If there's parts that stick out when you Zoom out from the image and look closer and further away, then fix it with brush on the mask. Like in the image I made, there's the edges of the hat in the close-up image that made the image you see when you're further away look like a turban. So I wanted to emphasize the forehead and the cut in the hair. I went to the mask, took a soft brush, opacity something like 20%. Painted on the edges of the hat, and the shape of the hairline of the blurred image on the backround and the part where background image's hair makes that V shape curve on top. Brushing them slightly darker made the background image to shine up a bit more.
10. Zoom the image so it's like about something in the range of... 200px? The smaller it is, less far you need to go to see the other image. So not bigger than about 200-300 if you plan to see it while standing in the same room. And Zoom in to see the image you want to be seen when you're close. Alternate between Zoom in and Zoom out, saves a lot of walking.
Balance between steps 9 and 10 until it's ready.
11. Last part. Resize the image to something like 100-200 wide and 200-300 high (portrait) or vice versa if landscape.
This is what I just figured out after looking at those images today... well, it's 00:57 at the moment, so yesterday... Anyways, so if some photoshop pro guru has any tutorials for this, I'd appreciate. Interesting stuff. Any idea what to call these images?


No comments:
Post a Comment